Guide: Setting Up TideCloak as an Identity Provider (IdP)
Welcome to the TideCloak Identity Provider (IdP) Quickstart guide! This document will walk you through the steps to set up TideCloak as an IdP, integrating it with your applications to enhance security and authentication.
Prerequisites
Before you begin, ensure that you have the following:
- Docker: Installed and running on your machine, as TideCloak will be deployed using Docker.
- Knowledge of TideCloak: Familiarity with TideCloak's configuration and management.
1: Accessing the TideCloak Admin Console
To manage your TideCloak instance, open your web browser and go to http://localhost:8080. You'll be prompted to log in with the credentials you specified earlier (admin/admin).
Once logged in, you can start configuring realms, clients, users, and more.
1.1 Create a Realm
- Click Keycloak next to the master realm, then click Create Realm.
- Enter
myrealmin the Realm name field. - Click Create.
1.2 Create a User
- Navigate to the Users section in the left-hand menu.
- Click Add user.
- Enter the desired username and fill in any additional details such as email, first name, and last name.
- Click Save.
1.3 Create a Client
- Navigate to the Clients section in the left-hand menu.
- Click Create.
- Enter a Client ID (e.g.,
myclient), and select the appropriate protocol (e.g.,openid-connect). - Click Save and proceed with configuring the client settings as needed.
Note: If you need more information or a more in-depth guide on creating and managing realms, users, and clients, please refer to Deploy TideCloak with Docker for detailed instructions.
2: Setup Tide as an Identity Provider
What is an Identity Provider (IdP)?
An Identity Provider (IdP) is a system that creates, maintains, and manages identity information while providing authentication services to applications within a trusted framework. When a user attempts to access a service, the IdP verifies the user's identity and provides secure access tokens or credentials that the service can trust, ensuring that only authorized users gain access.
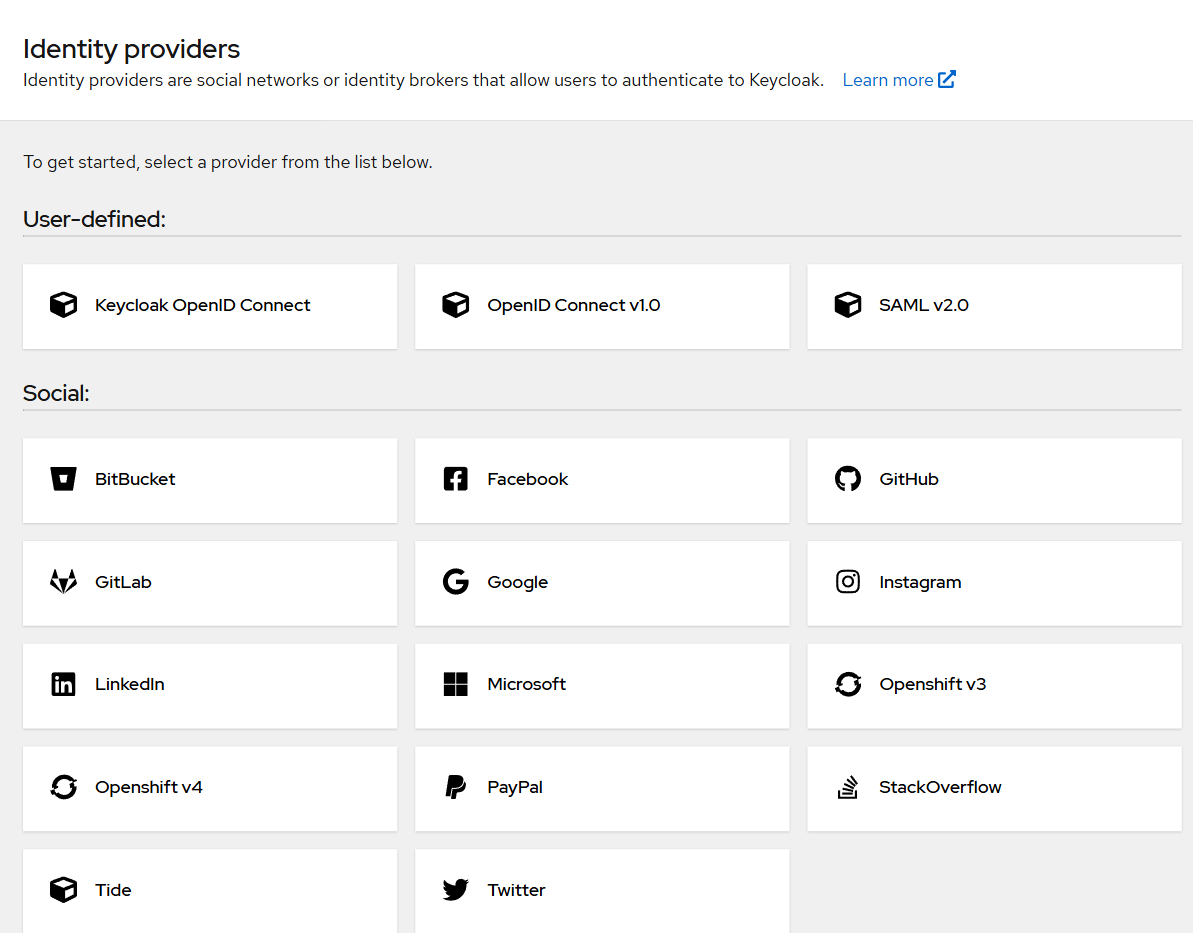
To enable Tide as an identity provider, do the following steps:
- Click Identity providers.
- Click the Tide from the selection.
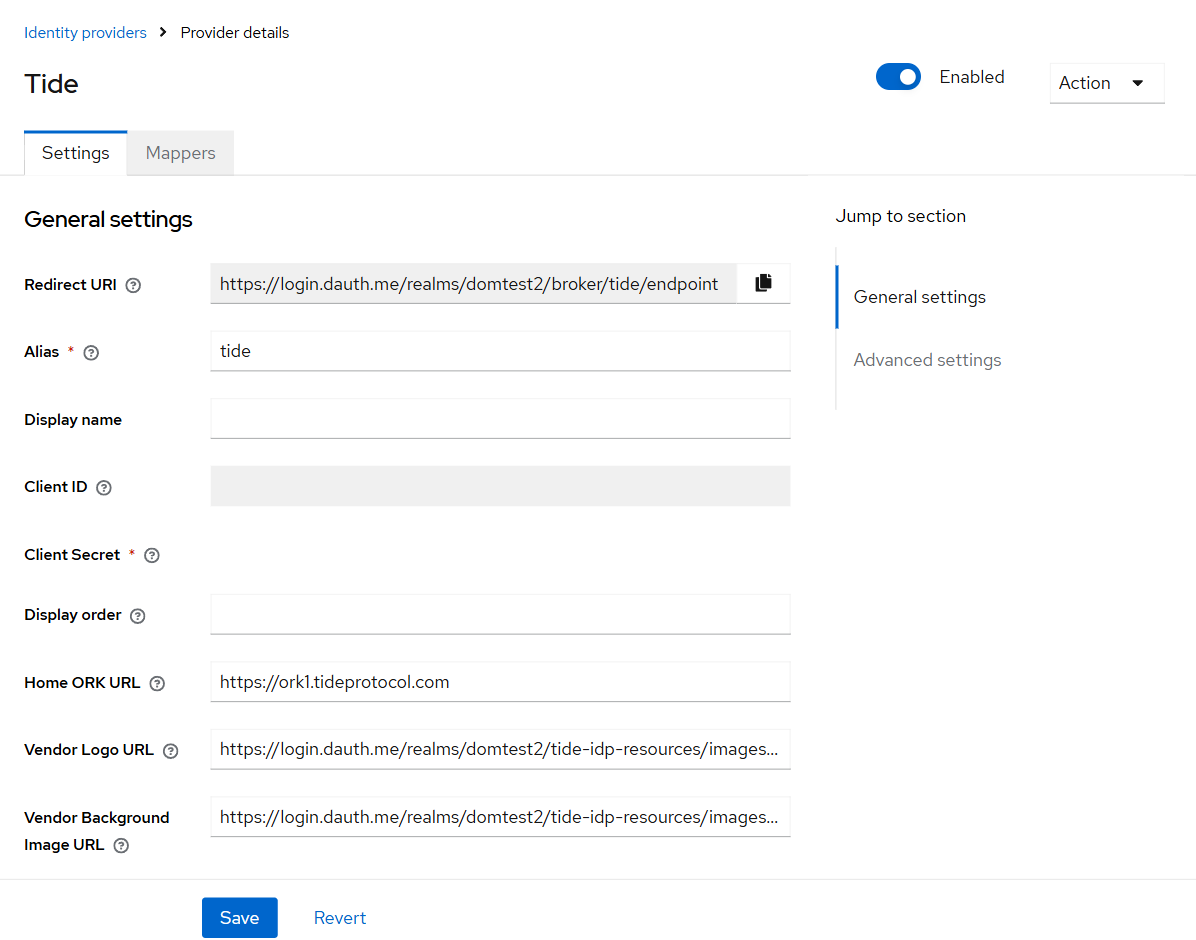
- On the "Add Tide Provider" screen, fill in the form exactly as shown in the image below. Once done, just click the Save button.
3: Setting up Tide as the default IDP redirect
Using Tide as your default Identity Provider (IdP) ensures that all authentication requests are processed through Tide's robust cybersecurity fabric, offering unparalleled security by decentralizing key management. By setting Tide as the default redirect, you streamline the login process, ensuring that users benefit from the enhanced security features of TideCloak.
Once you've set up TideCloak as an OIDC client for your application, follow these steps to make Tide the default login page.
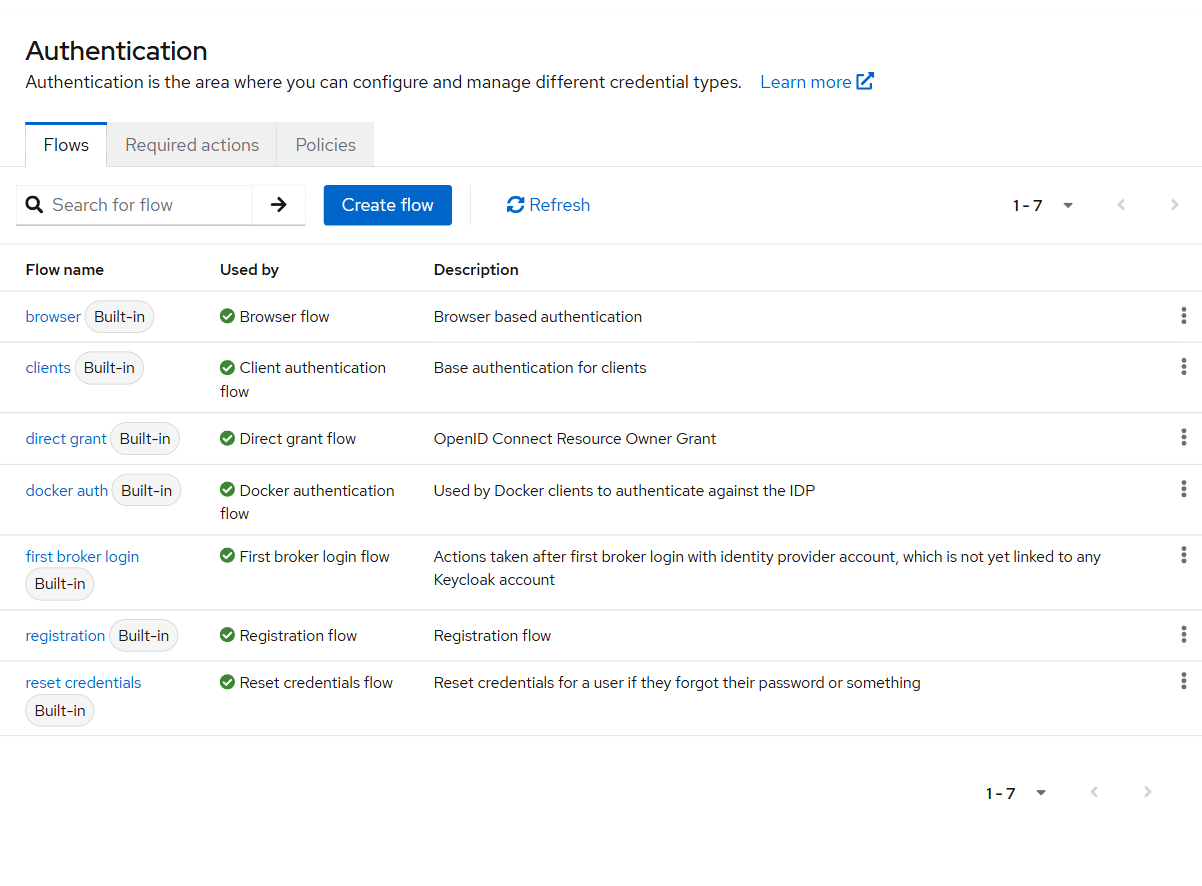
- Inside TideCloak, click Flows from the Authentication menu.
- Click browser to edit the settings.
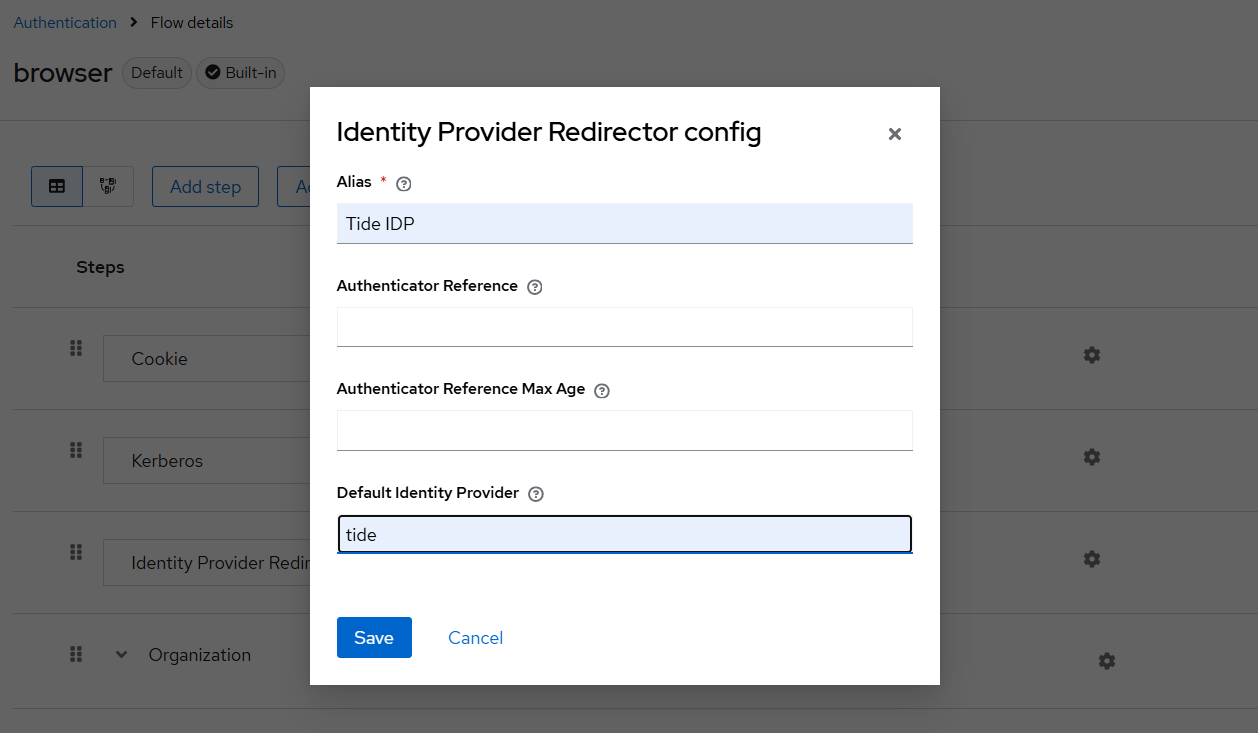
- Change the settings to the following and click on the settings of the Identity Provider Redirector
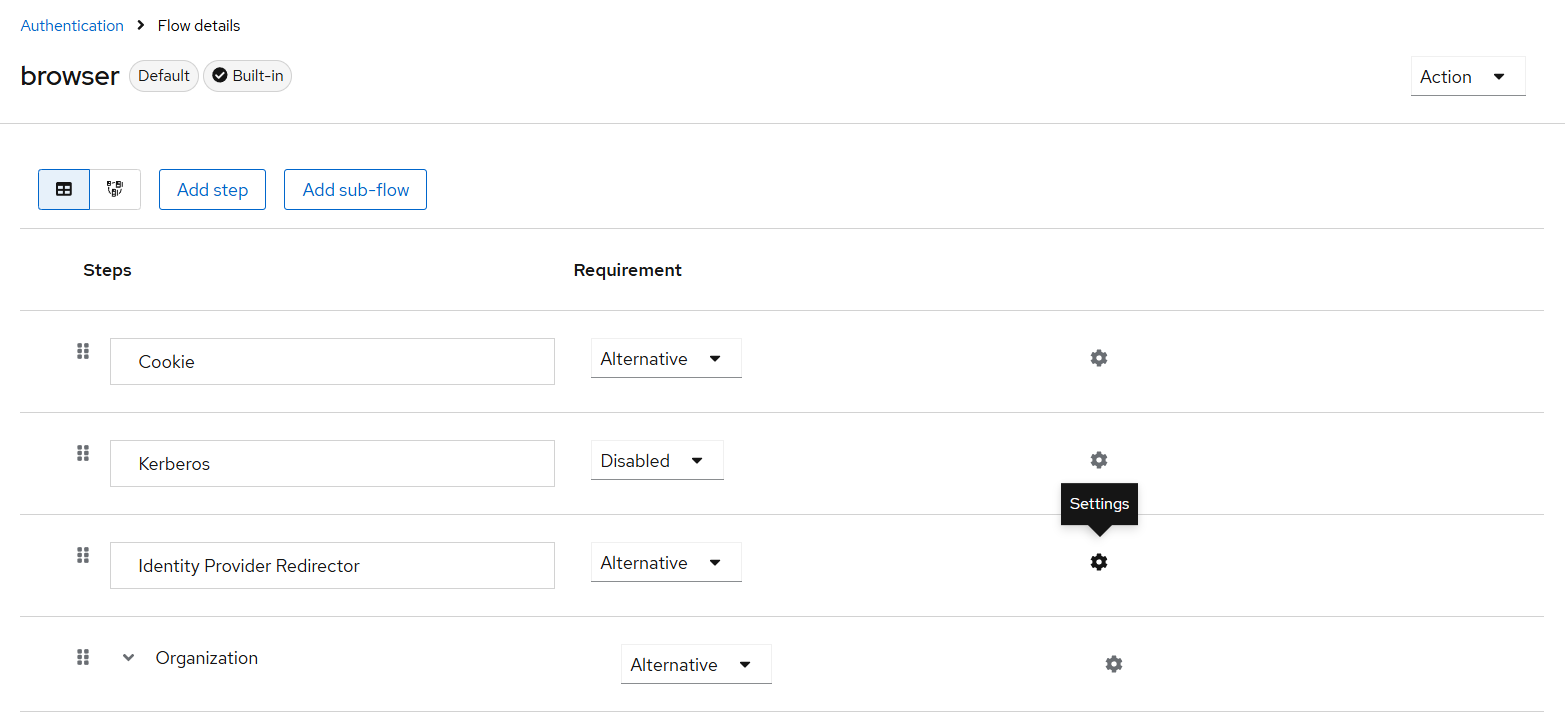
- You can name the Alias to whatever you prefer (Tide IDP is used in this instance) and use the Default Identity Provider as tide . Click Save .
4: Test Tide IDP
To confirm the client was created successfully and that TideCloak is functioning as expected, you can use the SPA testing application on the TideCloak website.
- Open the SPA Testing Application:
- Navigate to the SPA testing application on the TideCloak website.
- Save the Default Configuration:
- Click Save to use the default configuration provided by the testing application.
- Sign In:
- Click Sign in to authenticate to this application using the TideCloak server you started earlier.
If the client was set up correctly, you should be successfully redirected to the Tide login page, verifying that the client configuration is working as expected.
🎉 Congratulations on setting up TideCloak as your Identity Provider (IdP)! 🎉
You've successfully configured TideCloak as your Identity Provider, ensuring that your applications benefit from unparalleled security. By completing this setup, you've integrated a cutting-edge IdP solution that offers true-zero-trust technology, protecting your users and data with the highest standards of cryptographic security.
Recommended: Remove Redundant Information
To enhance security and ensure that no unnecessary information is stored on the TideCloak server, it is advisable to remove redundant fields such as first name, last name, and email from the user profile. This step helps in minimizing the data footprint and focuses solely on essential authentication details.
Remove Redundant User Information
- Access the User Profile Settings:
-
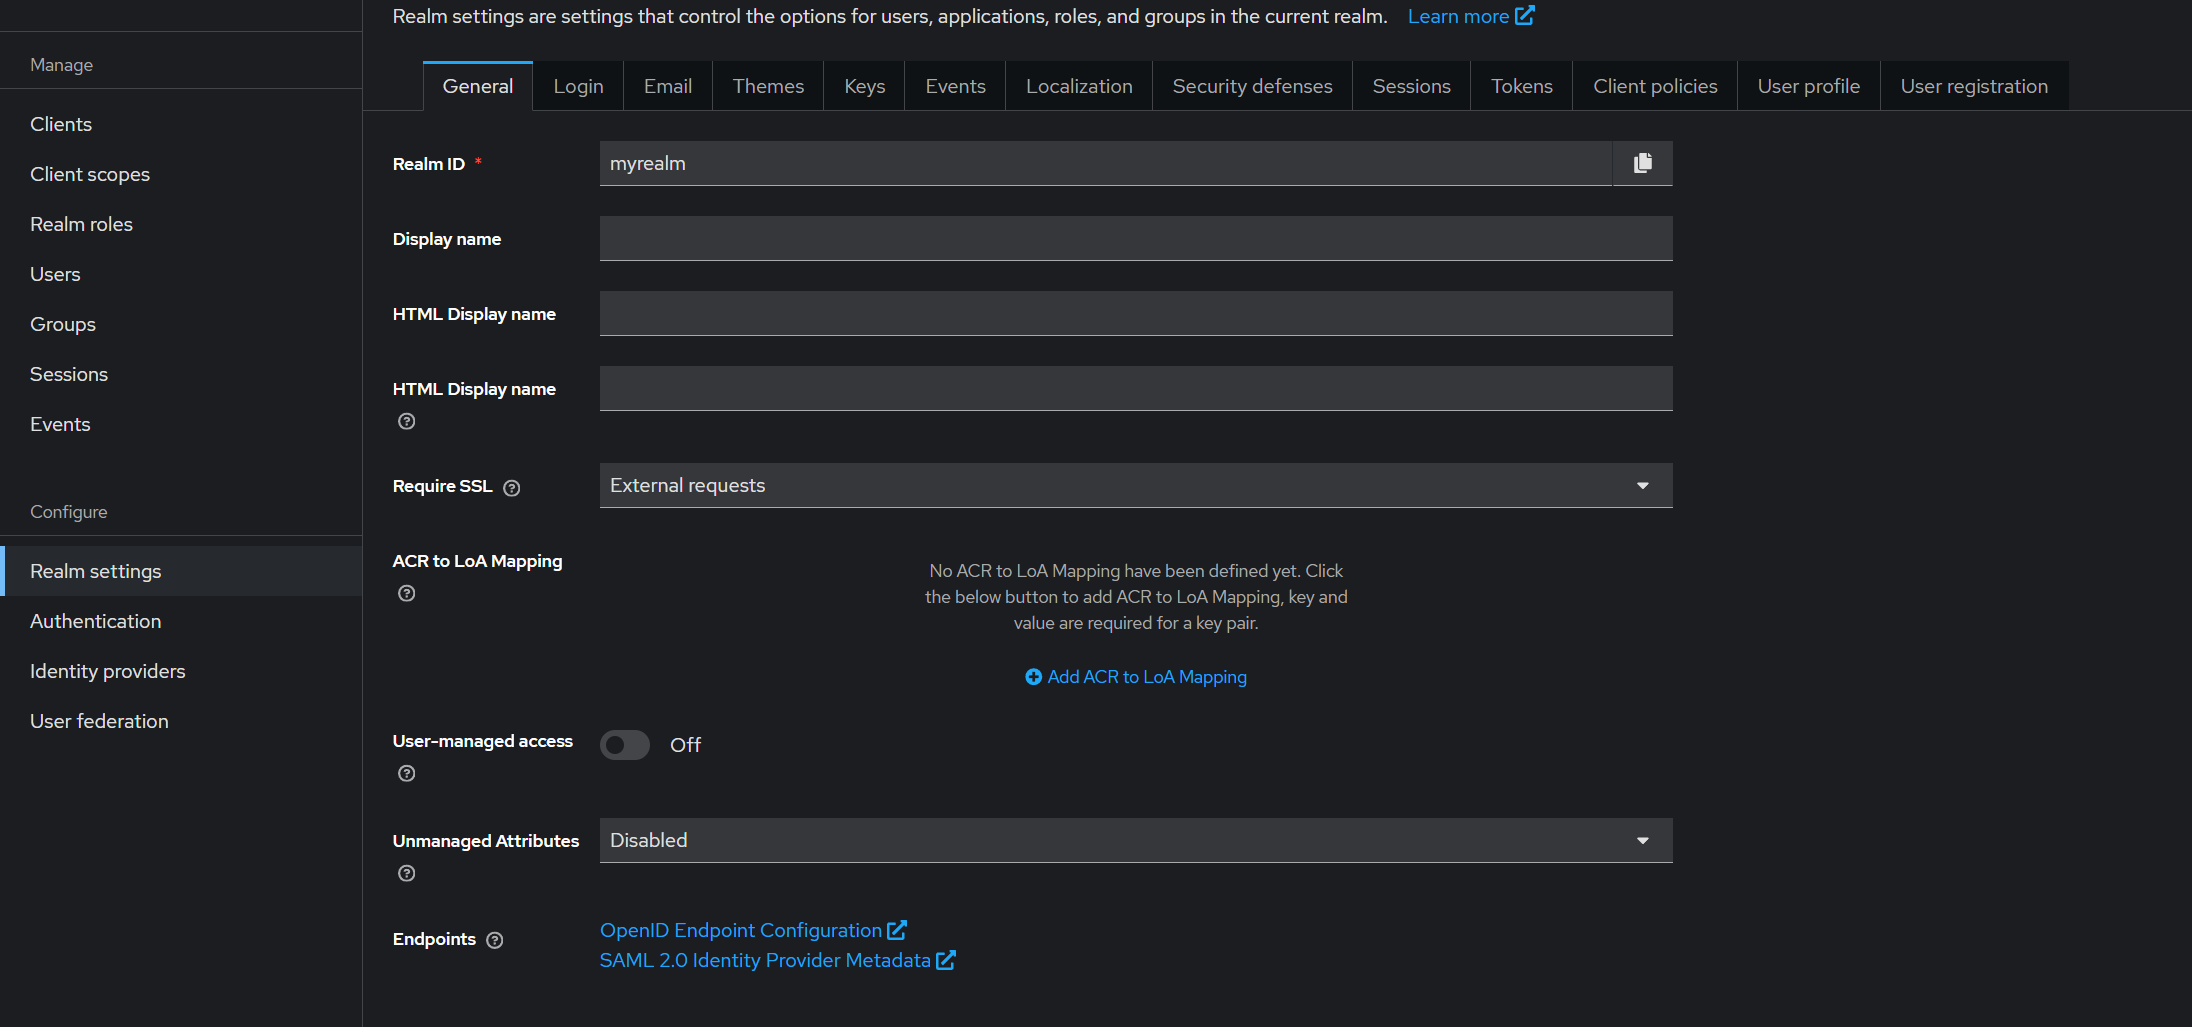
Navigate to the Realm Settings in the TideCloak Admin Console.
-
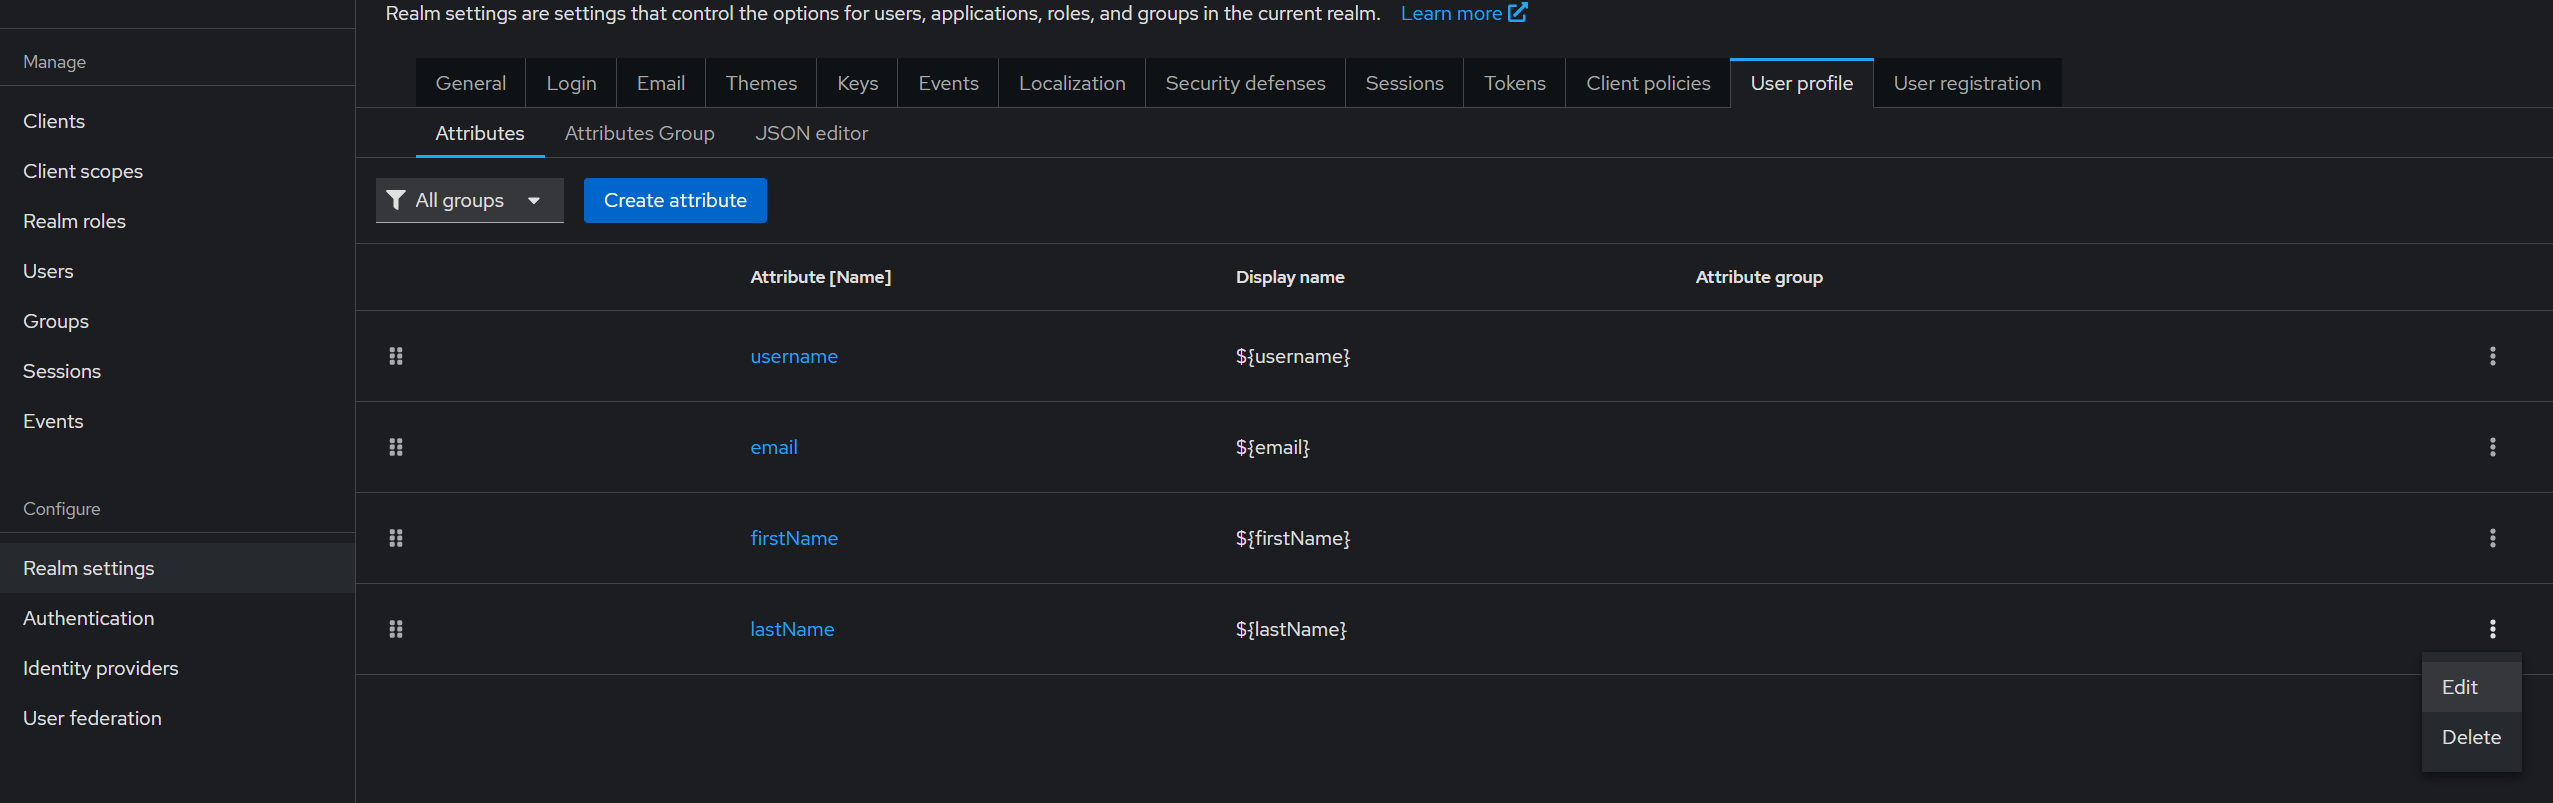
Go to the User Profile tab.
-
- Disable Unnecessary Fields:
-
Locate the options for First Name , Last Name , and Email fields.
-
Click Delete to remove these fields during user registration.
-
- Save the Changes:
- Once deleted, the changes will be automatically saved, ensuring that users are no longer prompted to enter first name, last name, and email during the registration process.
By removing these fields, you ensure that only necessary information is stored, aligning with the true-zero-trust security model of TideCloak.
Optional: Login/Registration With Tide
Access the Login Page
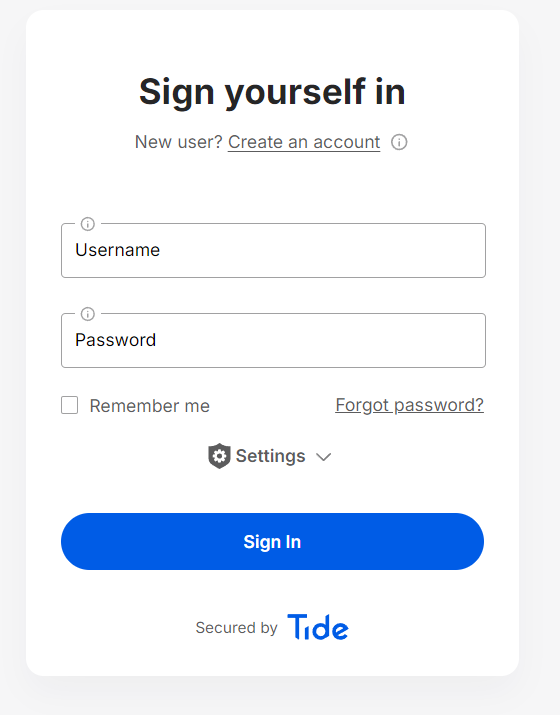
Once Tide is set up as your IdP, users can access the login page directly. The Tide login page is simple and secure, allowing users to sign in or create an account.
-
Navigate to the Login Page:
- Users will be directed to a page similar to the one shown below when attempting to sign in.
-
Create a New Account:
- If the user doesn't have an account, they can click on Create an account. This will redirect them to the registration page.
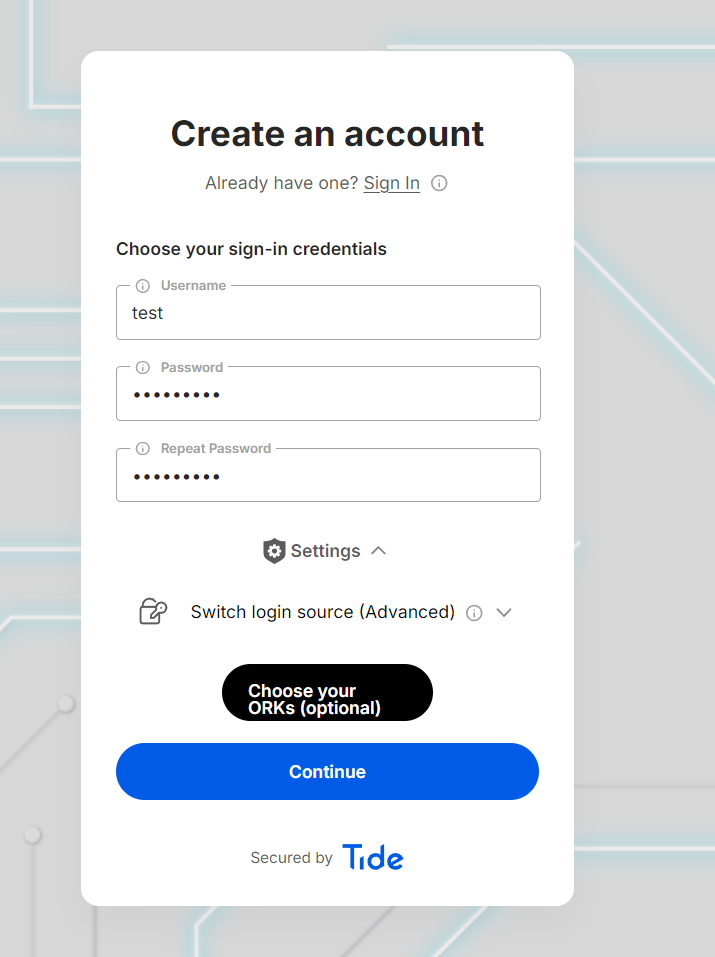
Registering with Tide
During the registration process, users can create a new account with enhanced security features provided by Tide.
-
Enter Registration Details:
- Users will be prompted to enter their username and password. Once the fields are filled out, they can click Continue to proceed.
-
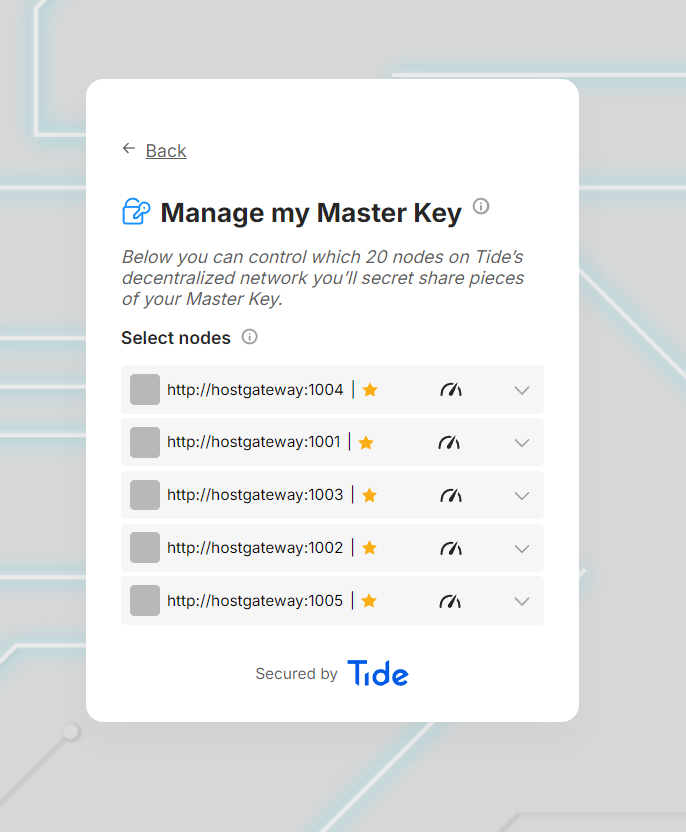
Manage Master Key:
- Users can manage their Master Key by selecting the nodes from Tide's decentralized network where their key will be stored. This step ensures that the user's key is securely distributed across multiple nodes.
-
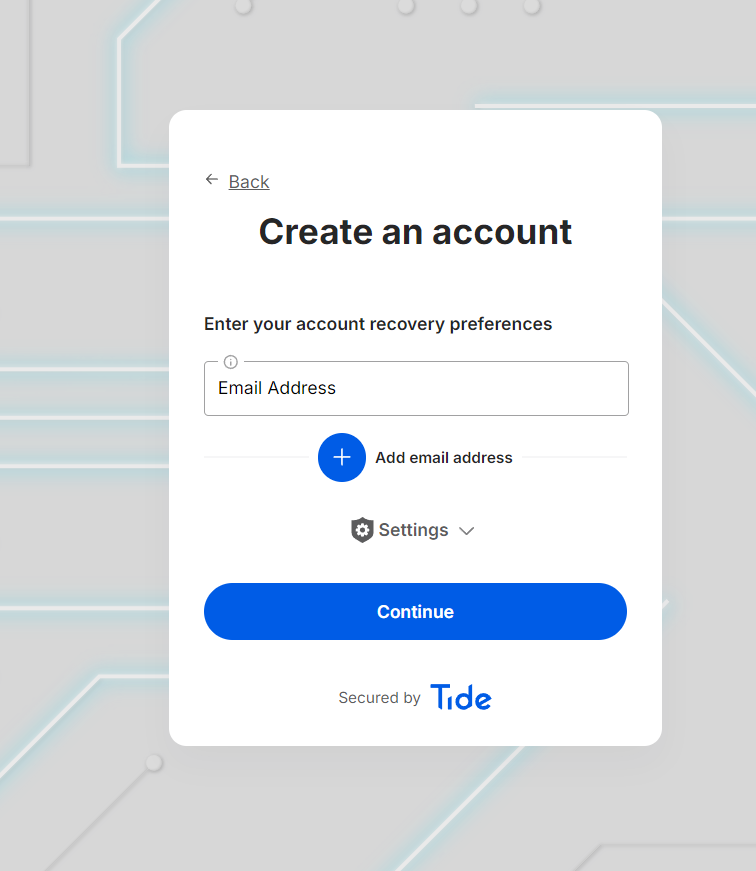
Set Account Recovery Preferences:
- Lastly, users can set their account recovery preferences by entering an email address. This helps in recovering the account if the user forgets their credentials.
-
Complete Registration:
- After filling out the necessary information, users can click Continue to complete the registration process.